
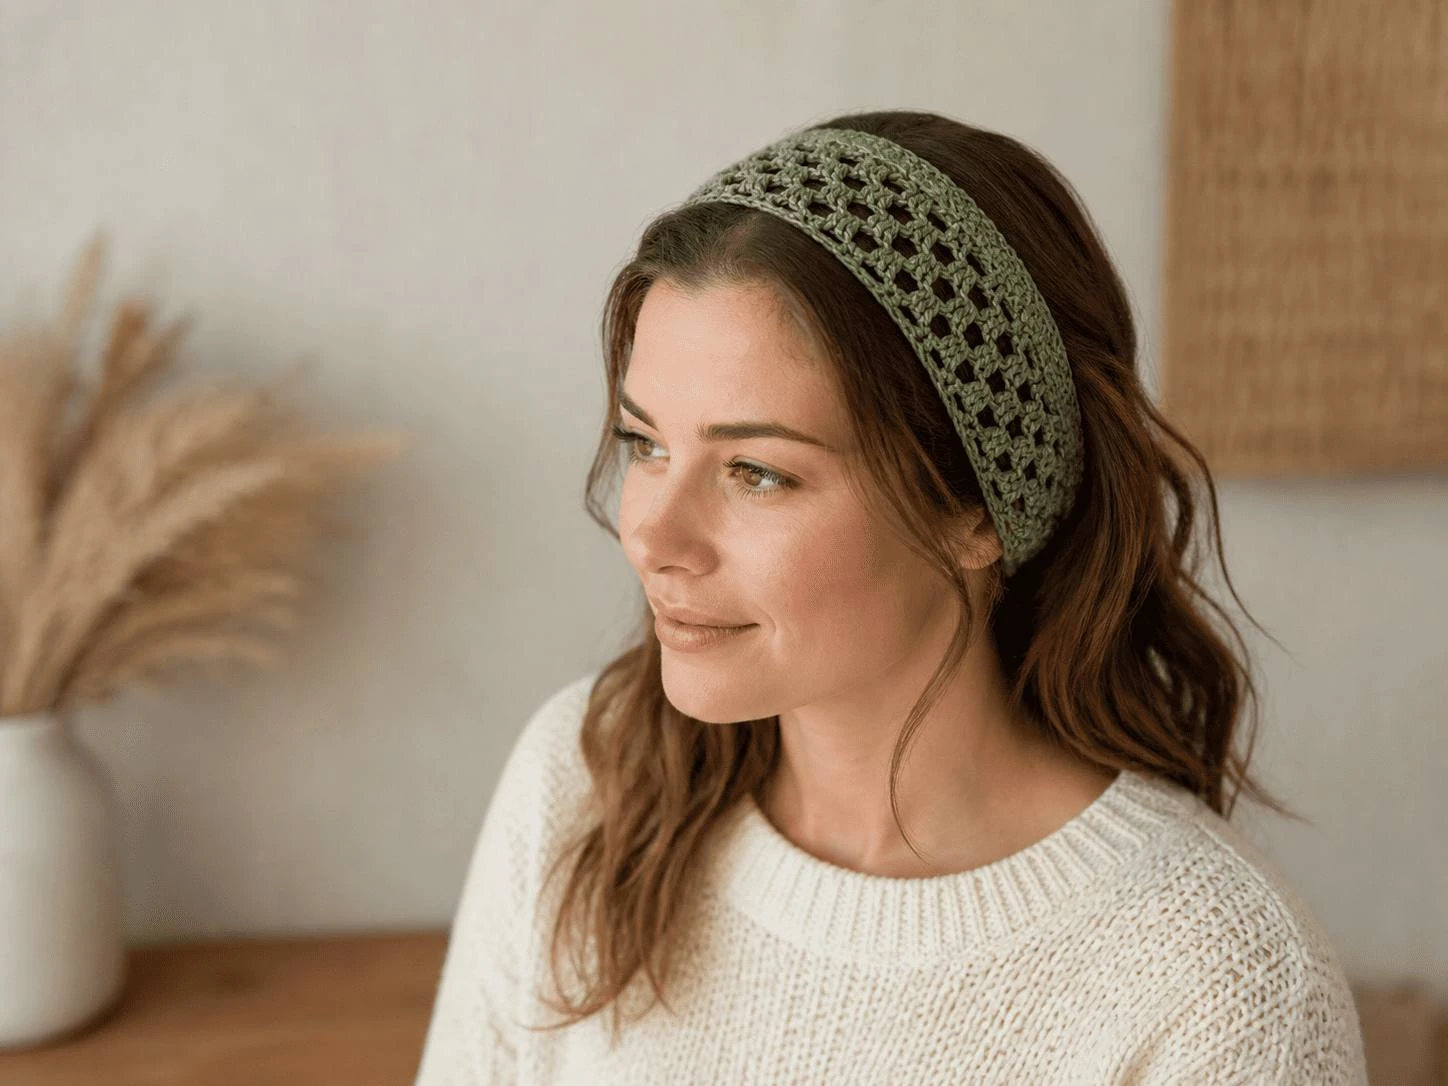
Crochet Mesh Hairband:
The 10-Minute Beginner Pattern That Needs No Ends Woven In
There is a bag somewhere in your house that you do not open. You know the one. A blanket that stopped at row nine because the colour changes got confusing. A cardigan with one finished sleeve and one hopeful ball of yarn sitting beside it. Maybe a scarf that was going to be a Christmas gift two Christmases ago.
That bag is not evidence that you are bad at crochet. It is evidence that you picked projects bigger than the uninterrupted time your life actually contains.
So here is a different kind of project. A crochet mesh hairband uses about ten grams of yarn, three basic stitches, and one row repeated until you are done. There are no ends to weave in, which means the moment you cut the yarn, the thing is finished. Not “finished except for the tidying.” Finished, wearable, out the door.
If you have never held a hook, this is a fair place to start. If you have held one for fifteen years, this is what you make on a Tuesday evening while you decide what the next big thing will be.
What Is a Crochet Mesh Hairband — And Why Make One?
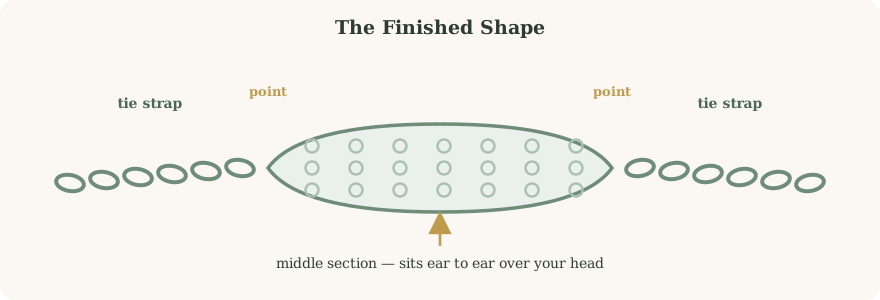
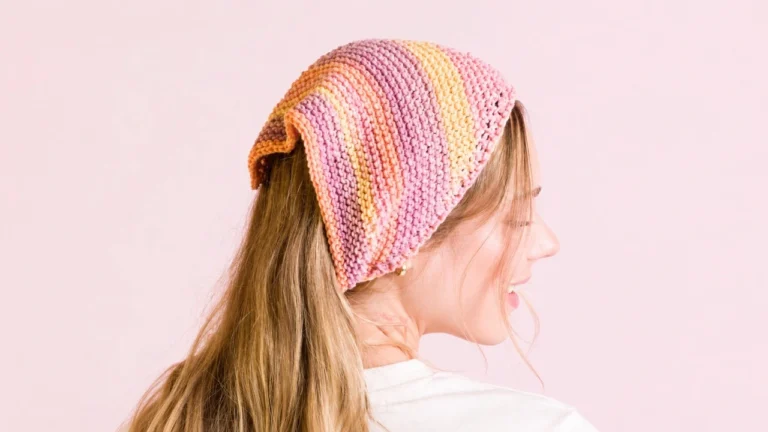
A crochet mesh hairband is a narrow, open-work band worked in double crochet with chain-1 gaps between the stitches, finished with a long chain tie at each end. It uses roughly ten grams of worsted-weight yarn and takes about ten minutes once you know the rhythm.
The Four Parts of the Band
- The straps — two chains of about forty stitches each, which tie at the nape of your neck
- The points — a cluster of three stitches at one end and a decrease at the other, tapering the band so the straps sit flat
- The mesh body — one single row, repeated twenty-odd times: double crochet, chain one, double crochet, chain one, double crochet
- The finish — cut, pull through, trim, wear
That third point is the one worth sitting with. Almost the whole hairband is one row you already know by the time you have done it twice. It looks intricate on your head and reads like almost nothing on paper.
Why This Pattern Works for Absolute Beginners
Three things make this a genuinely forgiving first project. The first is cost — ten grams of acrylic is a few pence of yarn, so three failed attempts cost you the price of a chocolate bar.
The second is speed of feedback. By the fourth row you can already see the mesh forming and tell whether your tension is even. Compare that to a blanket, where you find out something went wrong three hundred stitches too late.
The third is that there is no finishing stage. Weaving in ends is where a lot of beginners lose momentum — the crocheting is fun, the tidying is admin. This pattern skips the admin entirely.
What You Need to Crochet a Mesh Hairband
One of the best things about this project is how little you need. You almost certainly have all of it already.
Your Complete Supplies Table
| Material or Tool | Recommended Spec | Notes for Beginners |
|---|---|---|
| 🧶 Yarn | Medium weight (#4), about 10 g | A single 100 g skein makes eight to ten bands — this is a proper stash-buster |
| 🪝 Crochet Hook | 5.5 mm (US I-9) | Pairs cleanly with worsted yarn for an open, even mesh. Drop to 5.0 mm if you want it tighter |
| ✂ Scissors | Any sharp pair | Small embroidery scissors give the cleanest tail at the very end |
| 🧵 Tapestry Needle | Not needed | There is genuinely nothing to weave in — you can leave it in the drawer |
| 📏 Measuring Tape | Standard fabric tape | Used to measure ear-to-ear over your head before you decide on a row count |
Swipe the table sideways to see every column.
How Yarn Weight Changes the Finished Band
The width of your hairband is decided almost entirely by your yarn, not by the pattern. Weights below follow the Craft Yarn Council weight system. Run the exact same instructions with a different weight and you get a noticeably different accessory.
| Yarn Weight | Hook | What You Get | Suits |
|---|---|---|---|
| #3 (light / DK) | 5.5 mm | Narrower, more delicate mesh | Fine hair, children, layering |
| #4 (worsted / medium) | 5.5 mm | Fuller, wider band | Everyday adult wear |
| #5 (bulky) | 6.5 mm | Chunky, headband-like | Winter, statement pieces |
Swipe the table sideways to see every column.
You do not need to change hooks to change the look. Working #3 and #4 yarn on the same 5.5 mm hook gives you two visibly different bands from one set of instructions.
Choosing a Fibre Your Hair Will Actually Tolerate
This is the bit most tutorials skip, and it decides whether you wear the band or shelve it.
- Acrylic: cheap, holds its shape, keeps colour through washing. Can feel warm against the scalp in summer
- Cotton: breathable and soft, but with very little spring — add a row or two, since it relaxes with wear rather than bouncing back
- Cotton or bamboo blend: the best drape of the lot, and the least likely to snag fine hair
- Wool: skip it unless it is superwash — warmth and friction are exactly what makes untreated wool felt
The Stitches and Abbreviations You Need
You do not need a library of techniques for this project. Read this table once and you will not have to scroll back mid-row.
| Stitch | Short Form | What It Does | Where You Use It |
|---|---|---|---|
| Chain | ch | Creates the foundation loops your stitches build on | Both tie straps, and the turning chain at the start of every row |
| Double Crochet | dc | A tall stitch that gives the mesh its height and openness | Every row of the band |
| Double Crochet 3 Together | dc3tog | Merges three stitches into one to form a point | The final row only |
| Chain-3 Space | ch3-sp | The gap under the turning chain from the previous row | Where your last stitch of each row goes |
| Fasten Off | FO | Locks the final loop so the work cannot unravel | The very last step |
Swipe the table sideways to see every column.
Sizing Your Crochet Mesh Hairband
Two measurements control the fit, and they work independently. Band length is set by how many rows you work; strap length by how many chains you make at the start. Change one without touching the other.
Measure Yourself in Under a Minute
- Run a tape measure from just above one ear, over the top of your head, to just above the other. That is your band length.
- Take two to three centimetres off. The mesh stretches, and a band that fits perfectly on the table will sag by lunchtime.
- Measure from your ear to the nape of your neck, then add ten to twelve centimetres for tying. That is your strap length.
- Chain a short test length, measure it, and divide to get your own chain count.
Size Adjustment at a Glance
| Wearer | Band Length | Rows | Chains Per Strap |
|---|---|---|---|
| Child (3–8 years) | 20–22 cm | 16–18 | 30–35 |
| Teen or smaller adult | 24–25 cm | 20–22 | 35–40 |
| Standard adult | 27 cm | 24 | 40 |
| Larger head or thick hair | 29–31 cm | 26–28 | 45–50 |
Swipe the table sideways to see every column.
How to Crochet a Mesh Hairband, Step by Step
Work through these six steps in order. Take your time with the first one — a clean foundation chain sets you up for everything that follows.
Step 1: The Slip Knot and the First Strap
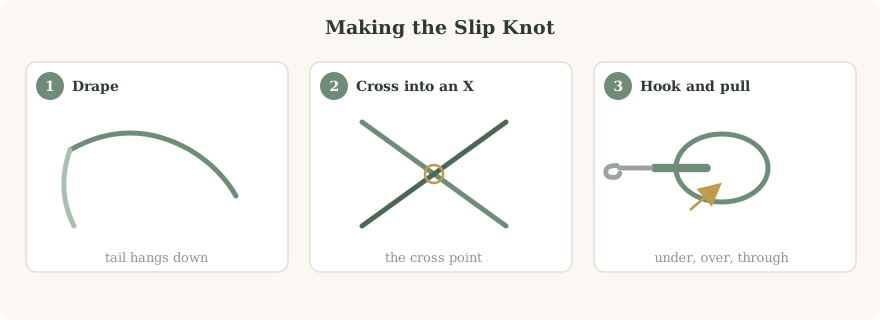
- Drape the yarn over your hand with the tail hanging down and pinch it with your thumb. Wrap the working yarn around two fingers so it crosses into an X.
- Slide your hook under one arm of that X, hook the other, and pull through. Slip your fingers out and snug it up — that is your slip knot.
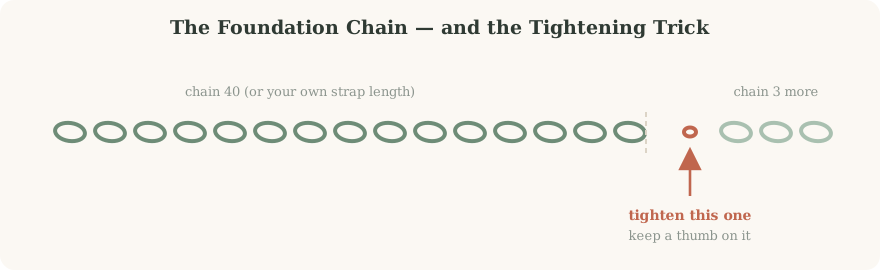
- Chain 40, or whatever your own measurement gave you. Yarn over, pull through the loop on your hook, repeat. This is your first tie strap.
Step 2: Row 1 — Three Stitches Into One Chain
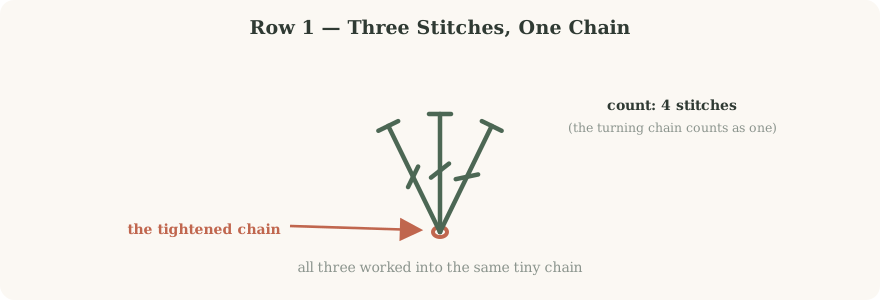
Work three double crochets into that tightened chain — the fourth chain from your hook. Yes, all three go into the same tiny space. It will feel wrong. Do it anyway.
Your stitch count is 4, because the chain-3 counts as the first double crochet. The three real stitches fan out from a single point, which is exactly the shape you want where the strap meets the band.
Step 3: Row 2 — Setting Up the Mesh
Chain 3 and turn your work over. That chain-3 stands in for your first stitch, so skip the stitch directly below it.
- Double crochet into the next stitch, working under the V at the top
- Chain 1
- Double crochet into the next stitch
- Chain 1
- Double crochet into the chain-3 space at the end
Count: 4 double crochets, 3 chains. You have just made the row you are going to make about twenty more times.
Step 4: Rows 3–22 — The Long Middle
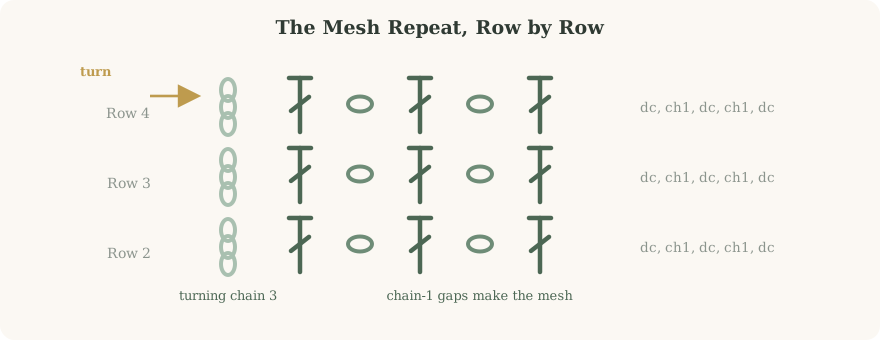
Every row from here is identical to Row 2. Chain 3, turn, skip the first stitch, then double crochet and chain one across, finishing in the chain space. There is one refinement that changes how the finished band looks, and it costs you nothing:
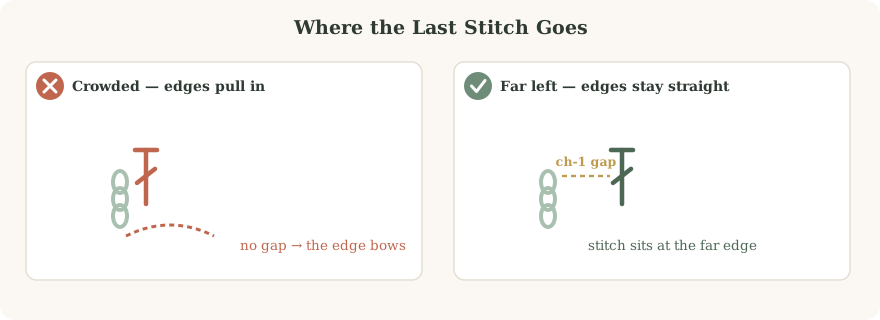
When you work that last double crochet into the chain space, put it at the far left edge rather than snug against the previous stitch. That chain-1 gap keeps both side edges parallel. Crowd it, and the band slowly pinches inward until one side is visibly narrower.
Step 5: Rows 23 and 24 — Closing the Point
Row 23 is your normal row with the gaps removed. Chain 2, turn, then double crochet into the next two stitches with no chain-1 between them, and finish with a double crochet into the chain-3 space. Count: 4.
Row 24 brings all of it to a point:
- Chain 2, turn, and skip the first stitch.
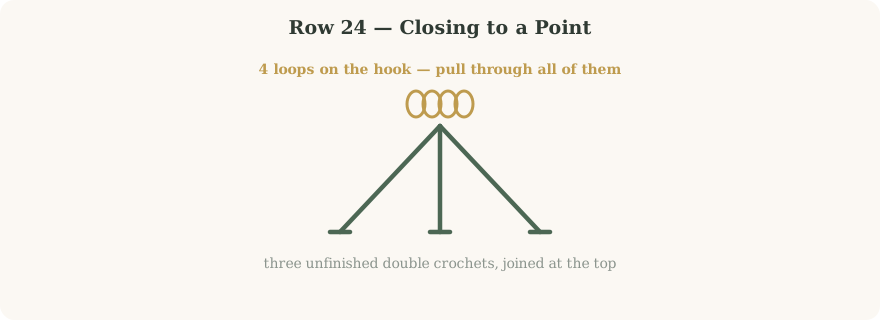
- Work a dc3tog across the last three stitches. For each one: yarn over, insert your hook, yarn over, pull through, yarn over, pull through two loops — and stop there, leaving a loop on the hook.
- Three times over leaves four loops sitting on your hook. Yarn over once more and pull through all four.
Count: 1. That single stitch mirrors the point from Row 1.
Step 6: The Second Strap and Fastening Off
- Chain 40 again, matching your first strap exactly. If you used a different count at the start, use that same number here.
- Cut the yarn short — you only need a stub, not a tail — pull it through the loop on your hook, and tighten.
- Line both strap ends up against each other and trim them to the same length, around an inch.
That is the whole thing. No needle, no weaving, no second session.
What Goes Wrong, and How to Fix It
| Problem | Cause | Fix |
|---|---|---|
| Gaping hole at the first point | The last foundation chain was not tightened | Pull Row 1 out, tighten the chain, rework it |
| Edges bow inward | Final stitch worked too close to the previous one | Move it to the far left of the chain space |
| Band gets wider each row | An extra stitch is sneaking into the turning chain | Count to four double crochets every single row |
| Band is loose after a day | The mesh stretched more than expected | Take out two rows — mesh grows roughly 10% in wear |
| Mesh looks tight and closed | Hook is too small for the yarn | Go up half a millimetre |
| Straps curl on themselves | Chains worked too tightly | Loosen your grip, or chain with a larger hook |
Swipe the table sideways to see every column.
Most of these are tension problems in different costumes. If your first band comes out wonky, make a second one straight away rather than unpicking the first. Your hands learn faster than your patience does.
Six Variations Worth Trying
Once the pattern lives in your fingers, it becomes a base rather than a destination. If you want a solid, closed-stitch band next, the crochet basic hairband pattern uses the same sizing logic with a different texture.
- Two-tone: switch colour halfway through the middle for a soft gradient
- Bow finish: tie at the crown instead of the nape, with deliberately long straps
- Beaded mesh: thread beads on before you start, then slide one into each chain-1 gap
- Wider band: add one extra “double crochet, chain one” per row for a three-gap mesh
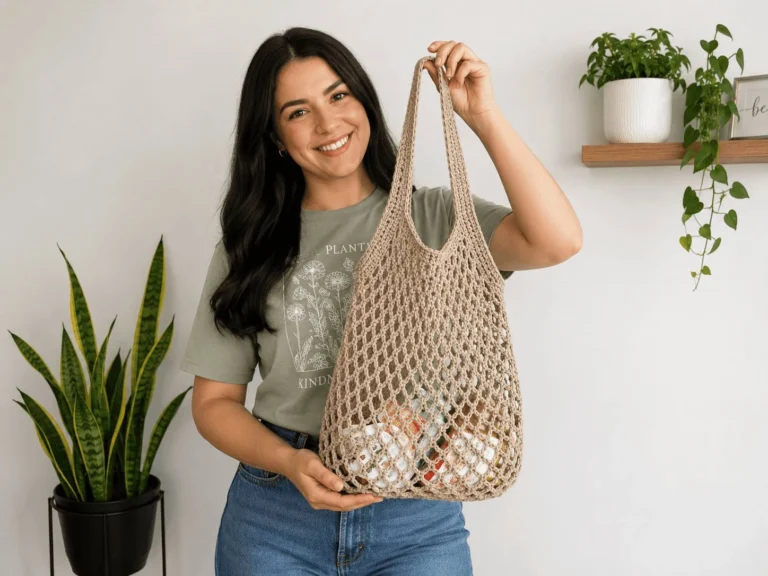
- Matching set: the same repeat scales up into a bandana or a market bag
- Gift stack: five bands from one skein, without a long evening
How Long Does It Really Take?
| Where You Are | First Attempt | Once You Have the Rhythm |
|---|---|---|
| Complete beginner | 45–60 minutes | 20–25 minutes |
| Confident beginner | 20–25 minutes | 12–15 minutes |
| Experienced | 10–12 minutes | 8–10 minutes |
Swipe the table sideways to see every column.
The ten-minute figure is real, but it is the speed of someone who has made this band dozens of times. If your first takes an hour, you are not slow — you are learning. The second will take half as long, and the fifth will take ten minutes flat.
Caring for Your Finished Hairband
| Yarn Fibre | Washing Method | Drying Method |
|---|---|---|
| Acrylic | Hand wash cool with mild detergent | Air dry flat — heat flattens the stitch definition |
| Cotton | Hand wash cool, or machine on a gentle cycle in a bag | Lay flat and reshape while damp |
| Bamboo blend | Hand wash cool only | Lay flat away from direct sunlight |
Swipe the table sideways to see every column.
Frequently Asked Questions About the Crochet Mesh Hairband
How much yarn does a crochet mesh hairband use?
What hook size should I use for a crochet mesh hairband?
Can I make this if I have never crocheted before?
Is this pattern written in US or UK terms?
How do I size the hairband for a child?
Why is there a big hole at the end of my band?
Will the mesh stretch out over time?
Can I sell hairbands I make from this pattern?
A Small Finished Thing
Go back to that bag for a second — the one with the sleeve and the ninth row and the almost-scarf. Nothing you make today fixes it. But this hairband does not go in there, and that matters more than it sounds. It is small on purpose.
And the stitch you just learned is not really a hairband stitch. That same repeat — double crochet, chain one, across and back — is the foundation of mesh bandanas, market bags, summer tops, and half the open-work patterns you have scrolled past and assumed were beyond you. You learned a structure, and it happened to come out hairband-shaped.
Your quick start checklist:
- Grab about 10 g of medium-weight yarn and a 5.5 mm hook
- Chain 40, tighten that last chain, then chain 3 more
- Work 3 double crochets into the tightened chain for Row 1
- Repeat “dc, ch1, dc, ch1, dc” until you are two rows short of your measurement
- Close with Row 23, then a dc3tog in Row 24
- Chain 40 for the second strap, fasten off, and trim both ends level
Made one? Tell us how it went.
Drop a comment with the yarn you used and how many rows fitted your head — the sizing table above gets sharper every time somebody shares their numbers.
And if a row is misbehaving, describe what is happening and we will work out where it went sideways.
6 Comments