Crochet Granny Square Triangle Bandana
There is a specific kind of yarn sitting in most crocheters’ stash: one skein, a color you love, not quite enough for anything ambitious. It waits for a project that matches its size and its Saturday-afternoon energy.
Most bandana patterns don’t solve that. They’re a rectangle folded and hoped into a triangle, or they demand a row gauge that falls apart the moment your tension runs tighter or looser than your target gauge.
A crochet granny square triangle bandana works differently. It grows from a single starting stitch, measures itself against your own hands, and forgives loose or tight tension without punishing the shape. You are not matching someone else’s tension — just repeating a rhythm until the piece tells you to stop.
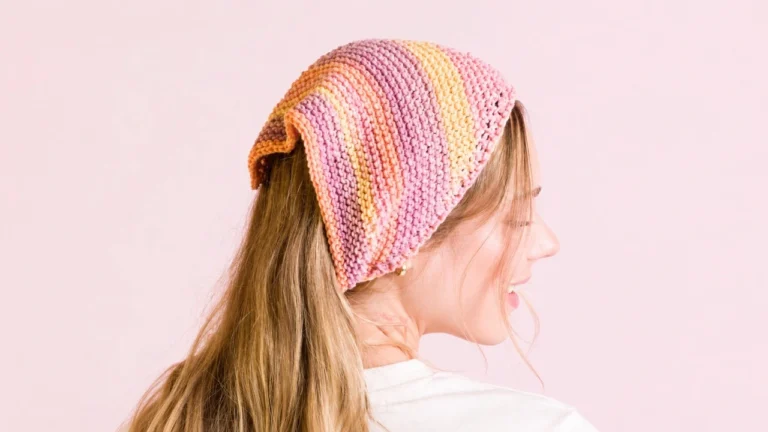
By the end of an afternoon, that skein becomes a wearable triangle with two ties built right in, no seam, nothing to sew on.
What a Granny Square Triangle Bandana Actually Is
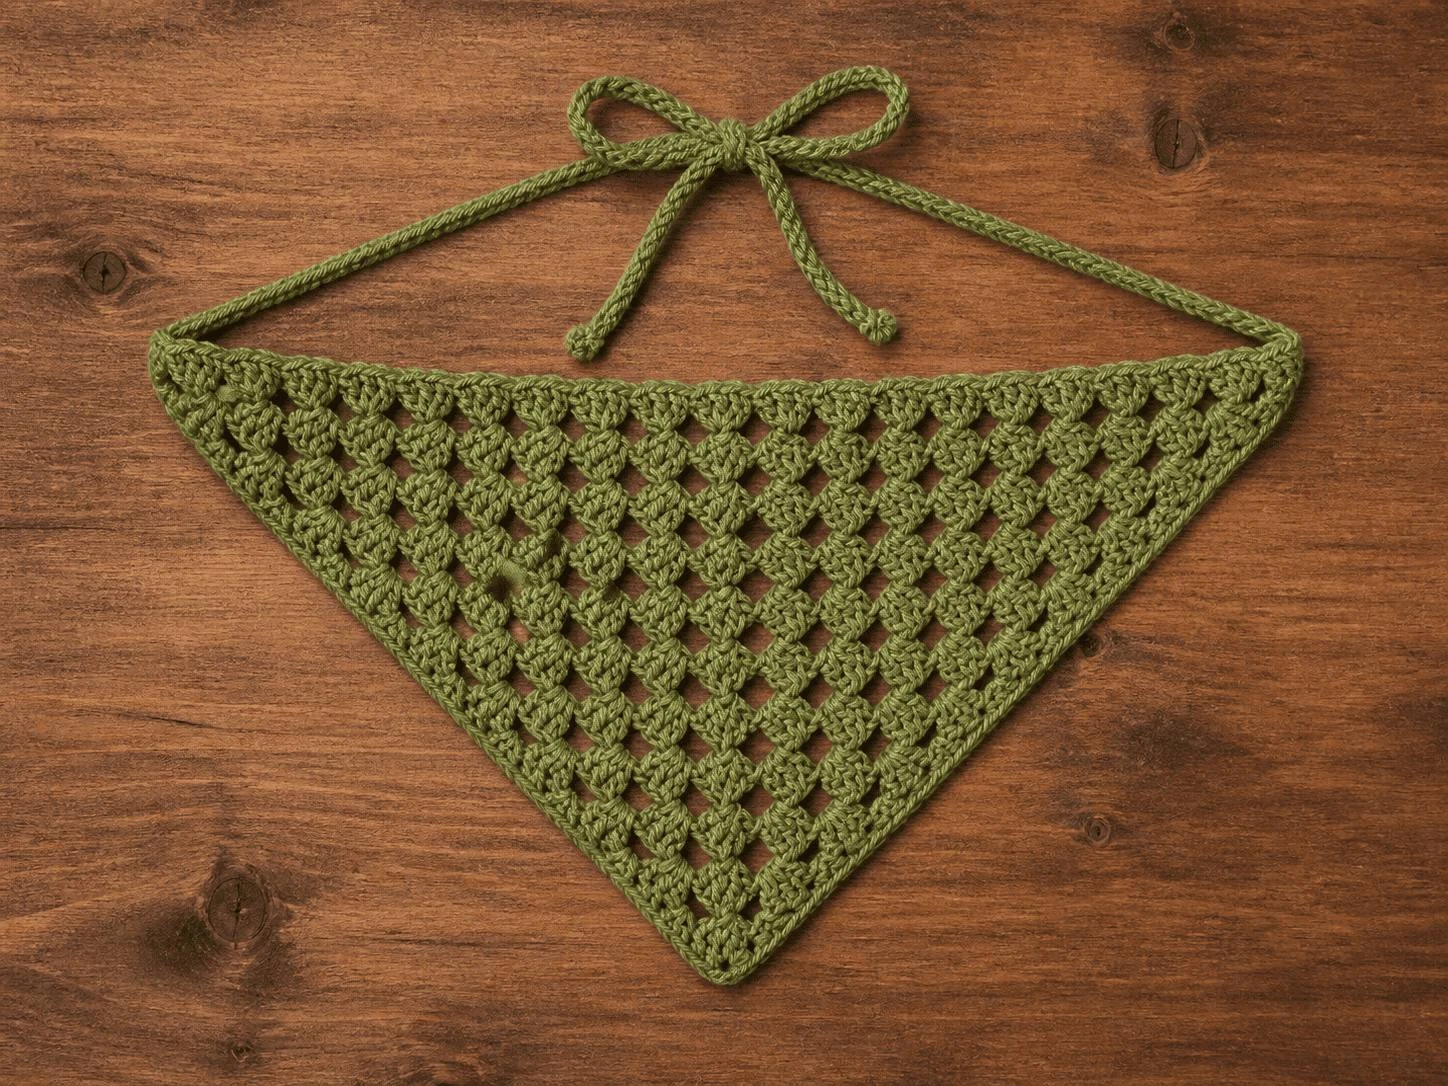
A granny square triangle bandana is a headscarf built like a granny square — clusters of three double crochets separated by chain spaces — except instead of joining in the round, you work the clusters back and forth in rows to form a triangle. One corner increases every row while the outer edges lengthen to match, so the piece grows outward without a gauge swatch in sight.
Four working parts are worth naming before you pick up a hook:
- The tip — the foundation chain every Row 1 stitch shares. It ends up at the center of the top edge, not a corner you tie.
- The center corner — the chain-2 space that increases every row, forming the bottom point over your forehead or under your chin.
- The two side edges — slanted rows of chain-1 spaces that grow by one space per row, giving the triangle its angles.
- The straps — two long chains worked off the top edge and joined with a slip stitch, so nothing needs sewing on.
This is a genuinely beginner-friendly project. The only stitches involved are chain, double crochet, and single crochet. What makes it feel intermediate at a glance is the corner-cluster start, where several stitch groups land in one chain stitch. After that, every row repeats the same three moves: a side space, the center corner, the matching side space opposite.
What You Need
This pattern is light on materials: one skein, one hook, and the small kit most crocheters already own.
| Item | Details |
|---|---|
| Yarn | Worsted / medium (4) weight, 100% mercerized cotton (e.g. Lion Brand 24/7 Cotton), approx. 73g / 136 yards |
| Crochet Hook | 4.0 mm (US size G/6), an ergonomic handle helps for the long strap rows |
| Yarn Needle | Blunt tip, for weaving in the two loose ends |
| Scissors | Sharp fabric scissors for clean cuts |
| Row Counter | Optional but genuinely useful — the repeating rows are easy to lose count of |
| Measuring Tape | For checking the short side against your target length as you go |
Swipe the table sideways to see every column.
Stitches and Abbreviations
Every stitch here is one you likely already know. What’s new is a construction move: working several stitch groups into a single chain stitch instead of spreading a foundation row across many chains.
| Abbreviation | Meaning |
|---|---|
| ch | Chain |
| dc | Double crochet |
| sc | Single crochet |
| sl st | Slip stitch |
| sp | Space (a chain gap you work stitches into, not a stitch itself) |
| st(s) | Stitch(es) |
Swipe the table sideways to see every column.
The One New Technique: The Corner-Cluster Start
Instead of a long foundation row, you make a slip knot, chain 6, and work every stitch of Row 1 — seven dc and both chain spaces — into just the first chain. The remaining chains aren’t wasted: they give your hook room to maneuver, and the slip-knot tail gets pulled snug afterward to close any gap. Think of it as a chain-loop alternative to a magic ring.
Getting the Right Fit
Because this triangle grows row by row rather than to a fixed stitch count, sizing it takes a tape measure, not a calculator.
- Decide how you’ll wear it. Center back with straps tying at the nape, or forward with the point at the hairline — same triangle, just rotated.
- Measure the coverage you want. Lay a tape measure ear to ear across your head to find your target short-side length.
- Work Rows 1 and 2 as written, then measure one short side from tip to top corner.
- Continue Row 3’s pattern, remeasuring every few rows, until the short side matches your target.
- Stop increasing once you hit your number, even between the row counts below.
| Size | Approx. Rows | Short Side | Long (Top) Edge |
|---|---|---|---|
| Petite / child | 12–13 rows | ~28 cm (11 in) | ~40 cm (16 in) |
| Standard adult | 17–18 rows | ~37 cm (14.5 in) | ~53 cm (21 in) |
| Oversized / scarf-style | 22–24 rows | ~46 cm (18 in) | ~66 cm (26 in) |
Swipe the table sideways to see every column.
Building the Triangle, Row by Row
Work every row in US terms, turning at the end of each. Read Row 2 fully first — it’s the one transition row built directly on Row 1’s single-stitch foundation, so it behaves differently from every row after it.
Row 1: The Foundation Fan
- Foundation: Make a slip knot, leaving a tail of about 5 inches. Chain 6.
- First cluster: Work 3 dc into the very first chain you made — the one closest to the slip knot, not your hook.
- Corner: Chain 2, then work 3 more dc into that same first chain (6 dc total, all in one stitch).
- Closing stitch: Chain 1, then work 1 dc into that same first chain. Do not cut the yarn.
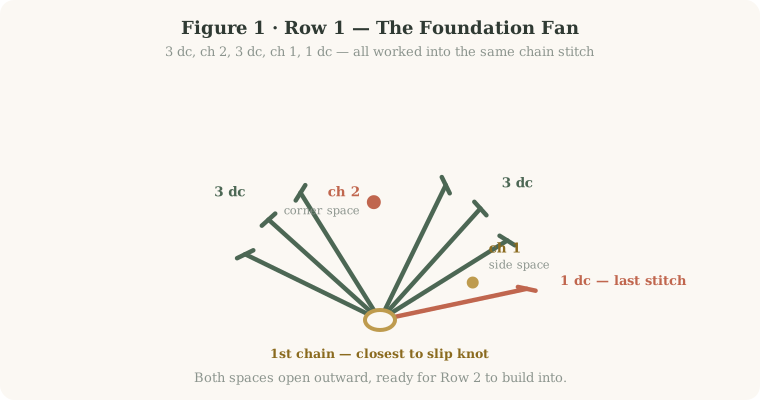
Count what you have: 7 dc and 3 chain stitches sharing one base chain, leaving two open spaces — a chain-2 corner space and a chain-1 side space before the final dc. Row 2 refers to both.
Row 2: The Transition Row
Row 1 only made a real chain-1 space on one side; the tip end has none yet. Row 2 builds that space itself as it closes — a detail most written versions skip.
- Turn and chain: Chain 5 (stands in for 1 dc plus a new chain-1 space) and turn.
- First side space: Work 3 dc into the real chain-1 space left from Row 1, right beside where you turned.
- Center corner: In the chain-2 space from Row 1, work 3 dc, chain 2, 3 dc.
- Closing the tip end: Row 1 has no space here, only the bare tip chain, so work directly into that foundation stitch: 3 dc, chain 1, 1 dc. This creates the chain-1 space Row 3 needs at the tip.
Row 3 and Beyond: The Repeating Rhythm
Every row from here repeats the same four moves.
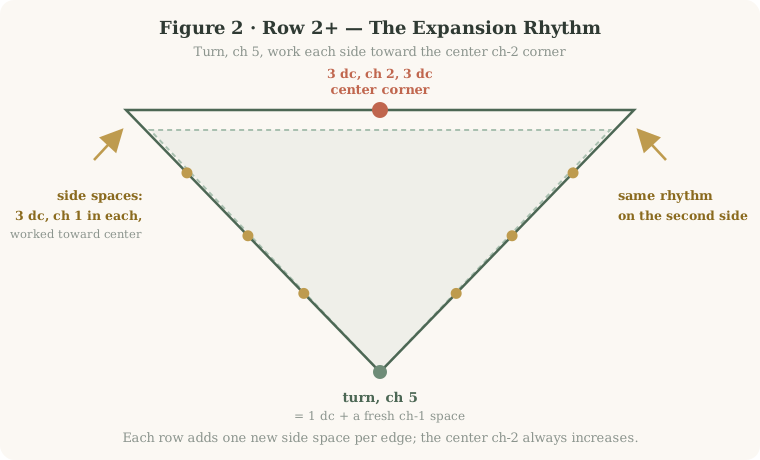
- Turn, chain 5. Work 3 dc into the first chain-1 space closest to where you turned.
- Sides: for every remaining chain-1 space between the start and the center, work 3 dc, chain 1 into each.
- Center corner: in the center chain-2 space, always work 3 dc, chain 2, 3 dc — the only increase in the row.
- Sides: for every chain-1 space between the center and the end, work 3 dc, chain 1 into each.
- End: in the last chain-1 space, work 3 dc, chain 1, 1 dc to close the row.
Repeat Row 3 until your short side reaches your Section 4 target — 17 to 18 rows for a standard adult. Fasten off, leaving a 5-inch tail.
The Integrated No-Sew Straps
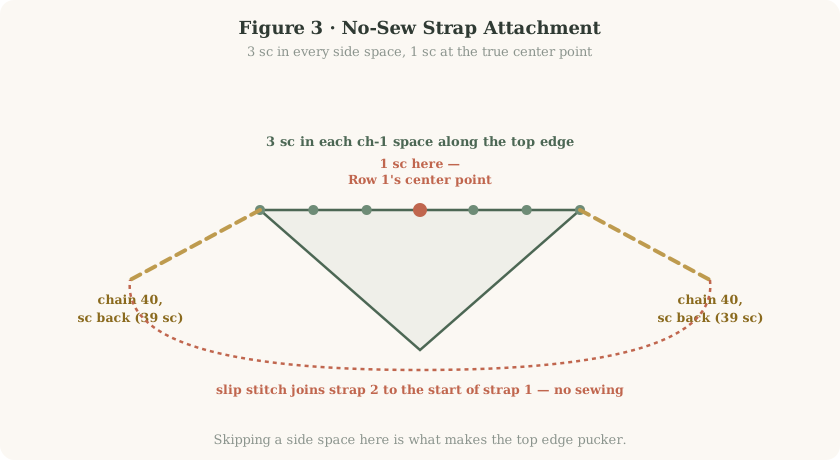
Rather than sewing on separate ties, this chains a strap off the last row, single crochets the top edge, then chains and finishes a second strap before slip-stitching the ends together.
- First strap: at the end of your final row, chain 40 (or your preferred strap length).
- Return along the strap: sc in the 2nd chain from the hook and each chain across — 39 sc.
- Top edge: work along the whole top edge. In every chain-1 side space, work 3 sc. At the original tip stitch from Row 1 (the exact center), work 1 sc, then continue 3 sc per space to the far corner.
- Second strap: at the last space on the opposite side, chain 40.
- Return: sc in the 2nd chain from the hook and each chain across (39 sc).
- Join without sewing: insert your hook into the first stitch of strap one, yarn over, and pull through both loops to slip stitch the straps together.
- Finish: chain 1, cut the yarn leaving a 5-inch tail, and pull through to fasten off.
Troubleshooting, Variations, and Care
Common Problems and Solutions
| Problem | Likely Cause | Solution |
|---|---|---|
| Triangle curls at the edges | Tension too tight, or a missed corner chain | Confirm the center corner always reads 3 dc, ch 2, 3 dc, then block flat while damp. |
| Visible hole at the tip | Foundation chain left loose | Pull the starting tail firm once Row 1 is done; weave it through the base stitches if a gap remains. |
| Top edge puckers | A chain-1 space skipped during the strap row | Count side spaces before starting straps, then work exactly 3 sc into every one. |
| Straps feel too short | Fewer than 40 foundation chains | Chain more — enough to wrap comfortably around your head with room to tie a bow. |
Swipe the table sideways to see every column.
Variations Worth Trying
- Add a border: before the straps, work one round of sc or crab stitch around the perimeter for a wider, more finished edge.
- Go two-tone: switch colors partway through the rows, or work the straps in a contrasting shade.
- Change the drape: a DK cotton blend softens the triangle; a heavier worsted on a 5.0mm hook loosens it.
- Make it a set: the same technique scales down into a matching crochet hairband.
How Long Each Size Takes
| Size | Rows | Approx. Time |
|---|---|---|
| Petite / child | 12–13 | 45–60 minutes |
| Standard adult | 17–18 | 1.5–2 hours |
| Oversized / scarf-style | 22–24 | 2.5–3 hours |
Swipe the table sideways to see every column.
Weaving In Ends and Care
- Weave each loose end under the horizontal loops of the strap stitches for about 2 inches with a blunt needle, then reverse and weave back skipping the first loop before trimming flush.
- Machine wash gentle and cold inside a mesh bag so the straps don’t tangle.
- Lay flat to dry, reshaping while damp — skip the dryer, since heat can shrink mercerized cotton.
- If edges curl, pin the piece into shape on a flat surface while damp and air dry fully.
Frequently Asked Questions About This Crochet Granny Square Triangle Bandana
Can I make this bandana larger or smaller than the sizes listed?
Do I have to use mercerized cotton for this pattern?
Why does Row 2 start with a chain of 5 instead of the usual chain 3?
My first row felt impossibly tight. Did I do something wrong?
Can I add a decorative border before attaching the straps?
How do I know which end of the top edge is the true center point?
What is the best way to tie the finished bandana?
Is this pattern beginner-friendly if I have never worked a granny cluster before?
Your Crochet Granny Square Triangle Bandana Is Ready to Wear
That one skein from the stash is no longer waiting for a project. You built a triangle from a single stitch and finished it with straps straight off the hook — no needle, no seam, nothing to sew on.
Your quick-start checklist:
- Slip knot, chain 6, work 3 dc, ch 2, 3 dc, ch 1, 1 dc all into the first chain
- Row 2: chain 5, use Row 1’s real ch-1 space and ch-2 corner, then close into the original tip chain
- Row 3 onward: chain 5, work every side space with 3 dc + ch 1, increase the center corner each row
- Repeat until the short sides match your target size
- Chain 40 per strap, sc back, and work 3 sc into every top-edge space (1 sc at the center point)
- Slip stitch the straps together to finish without sewing
- Weave in both ends, block if edges curl, and tie it on
Keep the leftover yardage in mind — the same technique scales down into a matching hairband for the days you skip the full bandana.
How did your triangle turn out?
Tell us how many rows it took to reach your target, and what yarn you used — it helps other crocheters gauge their version before they start.