
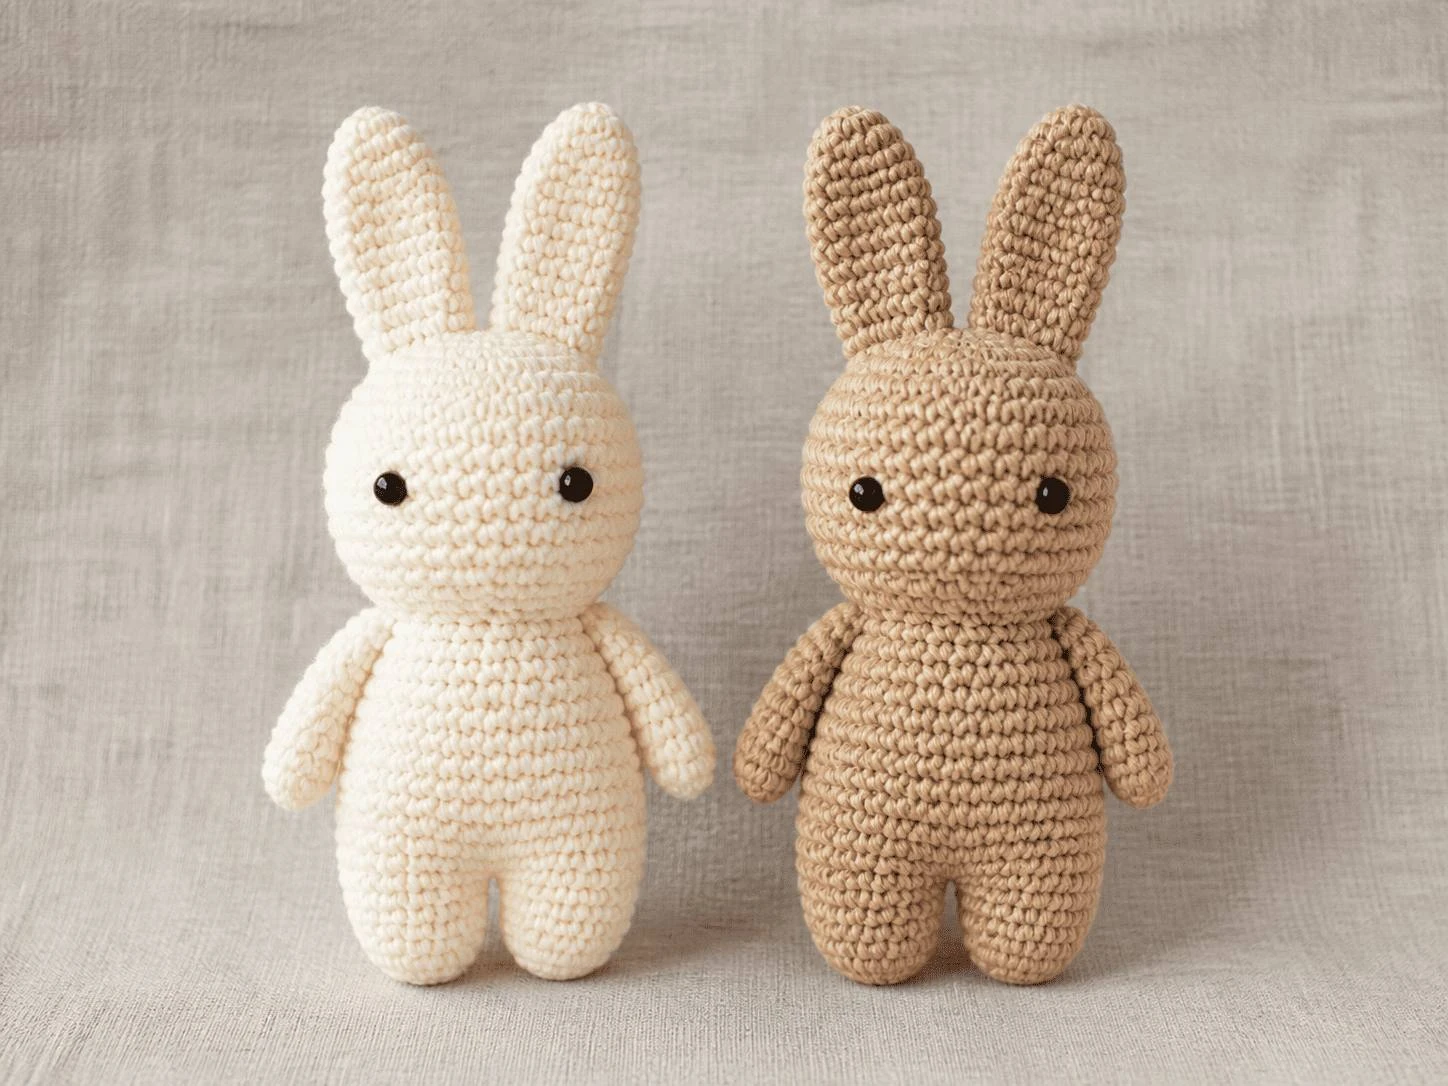
Crochet Bunny in Overalls: An Amigurumi Doll Pattern With a Tiny Wardrobe
You know the moment. You are somewhere around round fourteen of a plain amigurumi ball, and it still just looks like a ball. Nothing on your hook says “friend” yet, and it is tempting to put the hook down.
This pattern gets you past that moment twice: first when two stitches and a small cross turn a peach sphere into a face, then again when tiny blue overalls go on and the whole thing has a personality, not just a shape.
What makes this crochet bunny in overalls worth the evening: legs grow straight into the body, arms crochet on live with no seam to hide. It reads as a finished amigurumi bunny pattern, not parts assembled afterward. Clear the evening and let’s build one.
What This Crochet Bunny in Overalls Actually Is
A crochet bunny in overalls is a chibi-proportioned amigurumi doll: an oversized round head, a compact body, slim limbs, and two upright ears, dressed in a small crocheted outfit. Nothing is sewn on afterward except the ears, accessory, and outfit.
- Body: feet-first — legs, body, arms joined live, head closed with a needle cinch.
- Arms: flat-topped “hands,” attached at body round 10 through both layers, zero sewing.
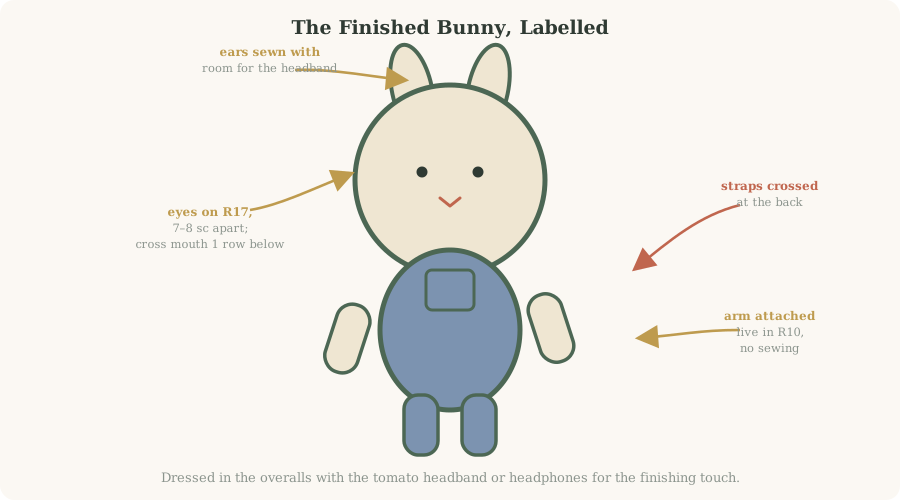
- Face: embroidered eyes on round 17, 7–8 sts apart, cross mouth one row below.
- Outfit: blue overalls — 28-st waistband, two 18-st trouser legs, a 6-st bib, chain-17 crossed straps.
- Accessories: tomato headband with a leaf, or gray headphones.
This suits a confident beginner: if you know the magic ring, single crochet, increases, and decreases, everything else is a new combination of those moves. The trickiest moment gets its own diagram below.
Materials, Tools & What Each Yarn Colour Is For
Nothing here is exotic: one main colour, a scrap of blue, red or gray for your accessory, black for the face. Sport or DK keeps the bunny in the 12–15 cm range from the sizing section below; see the Craft Yarn Council’s yarn weight standards if unclear.
| Item | Suggested | Notes |
|---|---|---|
| Main yarn | Peach/cream, sport–DK | ~30–40 g |
| Overalls + accessory yarn | Light blue; red/green or gray | Scraps |
| Embroidery | Black, split to 3 strands | Eyes and mouth |
| Hook | 2.5–3 mm | One size smaller than the band |
| Stuffing | Polyester fibre fill | Firm fill for a round head |
| Notions | Markers, scissors, needle | A marker at R1 saves recounts |
Swipe the table sideways to see every column.
Abbreviations & the One New Technique
| Abbreviation | Meaning |
|---|---|
| ch / st / R | chain / stitch / round or row |
| mr | magic ring |
| sc / hdc / sl st | single / half double / slip stitch |
| inc / dec | increase (2 sc in one st) / decrease (2 sc together) |
| BLO | back loop only |
| * … [ ] | repeat between markers; bracket = total stitch count |
Swipe the table sideways to see every column.
The one new move is crocheting through two layers at once, for the arms in round 10 and each trouser leg’s chain bridge: hold a flattened piece against the fabric and hook through both. Fiddly once, automatic by the second arm.
How Big Your Crochet Bunny Will Turn Out
This pattern has no stated gauge, so finished size follows yarn weight and hook choice.
- Work the first arm through round 8, lay it flat, and measure ring tip to folded edge; compare to 4 cm, roughly what sport-DK on a 2.5–3 mm hook gives.
- Size the hook, not the stitch counts, if more than 15% off — changing counts breaks the join math later.
| Yarn weight | Hook | Approx. sitting height |
|---|---|---|
| Fingering / sock | 2–2.5 mm | 9–11 cm, keychain scale |
| Sport – DK (as written) | 2.5–3 mm | 12–15 cm, this pattern’s size |
| Worsted | 3.5–4 mm | 17–20 cm, shelf-display scale |
Swipe the table sideways to see every column.
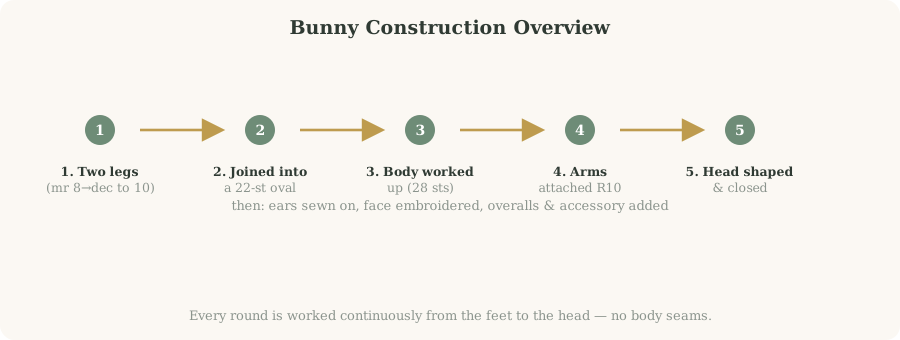
How the Whole Bunny Goes Together
Two legs join into one oval, the body works up from it, arms crochet on live, and a head closes the piece at the top.
Arms First: Make 2 Flat-Topped Hands
Each arm starts as a tiny cup and ends with a flattened top — that flat edge sits flush against the body later, so resist stuffing it.
- R1: 8 sc in mr [8].
- R2: (3 sc, inc) x 2 [10].
- R3–R8: 10 sc in each round [10].
- Close the top: flatten so front and back edges meet, work 5 sc through both, crocheting opposite stitches together. Fasten off, weave in the tail.
- Repeat for the second hand and set both aside — they return at body round 10.
Legs & Feet: Make 2, Rotated to Match
The legs begin wide at the foot, narrow at the ankle across two decrease rounds, then run straight. The extra 3 sc at the end of round 6 rotates the seam so both feet point the same way once joined.
- R1: 8 sc in mr [8].
- R2: 8 inc [16].
- R3: 16 sc [16].
- R4: 4 sc, 4 dec, 4 sc [12].
- R5: 4 sc, 2 dec, 4 sc [10].
- R6: 10 sc [10], then work 3 more sc and cut the yarn on the first leg.
- Second leg: repeat R1–R6 plus the 3 extra sc, but do not cut the yarn — you need it live for the join.
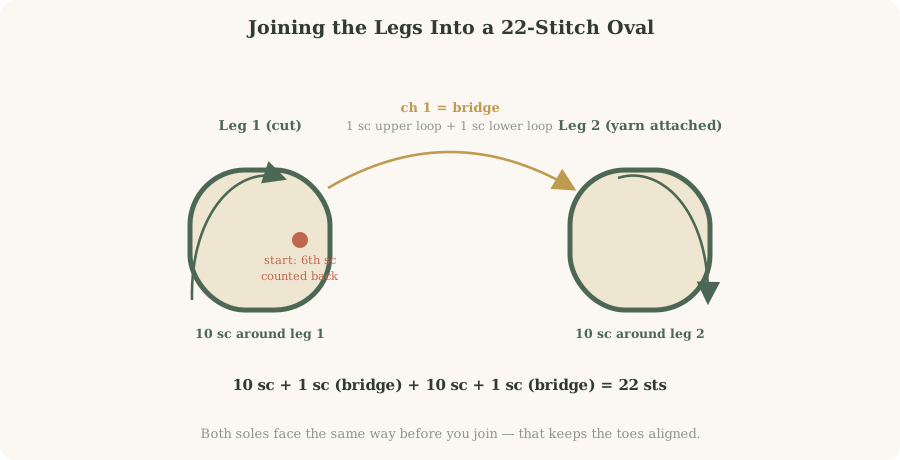
The Join: Turning Two Legs Into One 22-Stitch Body
Two separate tubes become one oval with a tiny chain bridge between them. Keep both feet pointing the same direction and the count lands exactly on 22.
- Find the join point: on the first (cut) leg, count back 6 sc from the last stitch and mark that spot.
- Ch 1 on the live second leg — this becomes the bridge.
- 10 sc around the first leg from the counted point, 1 sc into the bridge’s upper loop.
- 10 sc around the second leg, 1 sc into the bridge’s lower loop to close the oval [22].
Body, Rounds 2–9
- R2: (10 sc, inc) x 2 [24].
- R3: (5 sc, inc) x 4 [28].
- R4–R8: 28 sc in each round [28]. Add stuffing as the body firms up.
- R9: (5 sc, dec) x 4 [24].
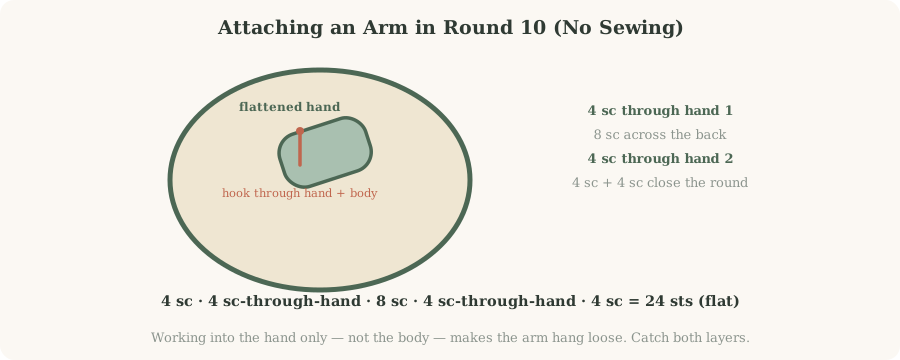
Attaching the Arms Live in Round 10
Round 10 is the no-sew trick: hold a flattened hand against the body wall and work each stitch through both layers, so the arm becomes part of the fabric.
- R10: 4 sc, then 4 sc through the first hand and the body together, 8 sc across the back, then 4 sc through the second hand and the body, 4 sc [24].
- R11: (2 sc, dec) x 6 [18].
The Head: Rounds 12–25
A classic amigurumi sphere: a burst of increases, a long even stretch, then staged decreases. Stuff it firmly — it is the part people squeeze first.
- R12: 18 inc [36].
- R13: (8 sc, inc) x 4 [40].
- R14–R21: 40 sc in each round, 8 rounds total [40].
- R22: (3 sc, dec) x 8 [32].
- R23: (1 sc, dec, 1 sc) x 8 [24].
- Stuff the head firmly now, shaping it round with your fingers.
- R24: (1 sc, dec) x 8 [16].
- R25: 8 dec [8].
- Close: cut a long tail, weave through the front loops of the last 8 stitches, pull tight and knot inside. Bury the tail.
Ears, Face & the Overalls
Ears (make 2)
- R1: 8 sc in mr [8].
- R2: (1 sc, inc) x 4 [12].
- R3–R9: 12 sc in each round [12].
- Finish: flatten slightly, a pinch of stuffing if desired, fasten off with a long tail. Repeat for ear two.
Embroidering the face
- Eyes: round 17, 7–8 sc apart. Two or three short vertical stitches per eye read as round dots.
- Mouth: one row below, centered, a small cross.
- Finish: carry the needle between features, bury the knots inside.
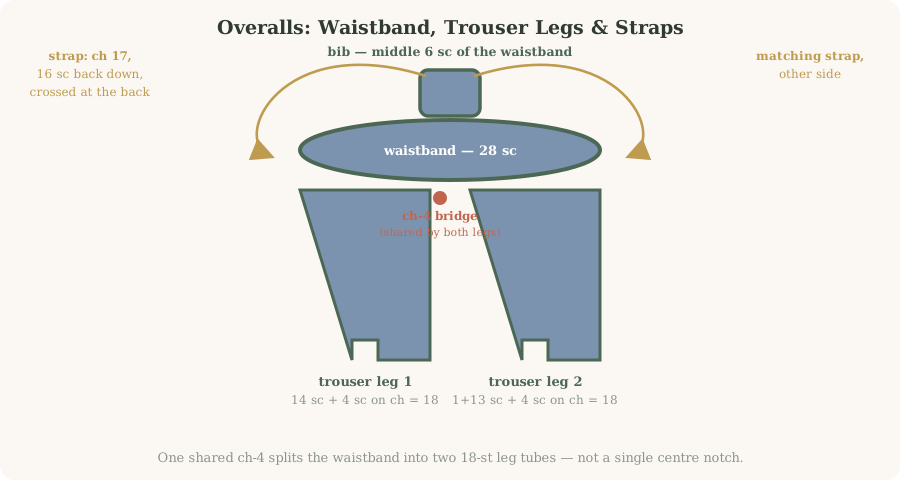
Overalls: waistband, trouser legs, bib & straps
Worked waist down, then back up for the bib and straps.
| Piece | Rounds | Count |
|---|---|---|
| Waistband | Ch 29. R1: 28 sc, join sl st. R2–R3: ch 1, 28 sc, sl st (2 rounds). | 28 |
| Trouser leg 1 | R1: ch 1, 14 sc, ch 4, join sl st — the ch-4 splits the round into two leg openings. R2: ch 1, 14 sc, 4 sc on the chain, sl st. R3–R5: ch 1, 18 sc, sl st (3 rounds). Fasten off. | 18 |
| Trouser leg 2 | Attach next to the sl st: ch 1, 1 sc, 4 sc on the chain, 13 sc, sl st. R2–R4: ch 1, 18 sc, sl st (3 rounds). Fasten off. | 18 |
Swipe the table sideways to see every column.
Bib & straps
- Find the middle 6 sc on the waistband front — that is the bib.
- Bib R1: ch 1, 6 sc [6]. R2–R3: ch 1, turn, 6 sc [6].
- Straps row: 3 sc, ch 17, 16 sc back, 6 sc across the bib top, ch 17, 16 sc, 3 sc. Fasten off.
- Dress the bunny, cross the straps at the back and sew down.
Choose an Accessory: Tomato Headband, Leaf, or Headphones
| Accessory | Pattern | Count |
|---|---|---|
| Tomato headband | Ch 18. R1: 16 hdc. R2: ch 2, turn, 16 hdc. Side tab (both sides): ch 1, 4 sc down; ch 1, turn, 2 dec; ch 1, cut, long tail. | 16 |
| Tomato leaf | Mr, then 5x: ch 3, sl st, 1 sc, sl st into the mr. Pull tight, fasten off, tie at the head base or stitch to the headband. | 5 pts |
| Headphone cups (x2) | R1: 7 sc in mr, sl st. R2: ch 1, 7 inc, sl st. R3: ch 1, BLO 14 sc, sl st. Fasten off cup 1; keep yarn on cup 2. | 7→14 |
| Headphone band | Ch 15, 2 sl st on cup 1, 15 sl st back across, 1 sl st on cup 2. Fasten off. Sew cups over the lower head, band arcing over the top. | — |
Swipe the table sideways to see every column.
Troubleshooting, Variations & Care
Most problems with this crochet bunny with clothes trace back here:
| Problem | Cause | Fix |
|---|---|---|
| Feet point different ways | Missed the 3-extra-sc landmark | Rotate; join at the 6th sc back |
| Hole at the crotch | Chain bridge too loose | Work it firmly; close gaps with the leg tail |
| Arms hang by a thread | sc worked into the body only | Rework through hand and body together |
| Head has a star pucker | Cinched without weaving both loops | Weave all 8 loops twice, then pull |
| Overalls will not fit | Tension mismatch | Try on before straps; adjust hook size |
Swipe the table sideways to see every column.
Easy variations: skip the overalls for a plain bunny; add a shoulder-blade loop before closing the body for a bag charm; or make both accessories from scrap yarn.
| Stage | Time |
|---|---|
| Arms, legs & join | 30 min |
| Body, arms & head | 40 min |
| Ears, face & overalls | 30 min |
| One accessory | 10 min |
Swipe the table sideways to see every column.
| Care | How |
|---|---|
| Washing | Hand wash cool, mild soap; press dry in a towel, reshape, dry flat |
| Safety | Embroidered eyes, no plastic parts — a safer gift for younger hands |
Swipe the table sideways to see every column.
Crochet Bunny in Overalls: Frequently Asked Questions
How big is the finished crochet bunny in overalls?
Can I make the bunny without the overalls?
Why are the arms attached in round 10, not sewn on?
The leg join looks confusing. Is there a shortcut?
What if my stitch count drifts somewhere in the head?
Should I make the tomato headband or the headphones?
Do both trouser legs need the exact same round count?
Can this crochet bunny with clothes double as a keychain?
Your Bunny Is Dressed and Ready
Back to that plain peach sphere at round fourteen: this is where it was always headed. Two legs became one oval, the body grew arms without a single seam, and a once-featureless head now has an expression. Then it got dressed.
Your quick-start checklist:
- Arms closed flat with 5 sc, unstuffed, set aside for round 10.
- Legs joined into a clean 22-stitch oval, toes aligned.
- Arms crocheted on live in R10, through both layers.
- Head stuffed firm, closed with an invisible cinch.
- Eyes on R17, 7–8 sc apart, cross mouth below.
- Overalls on, straps crossed, accessory attached.
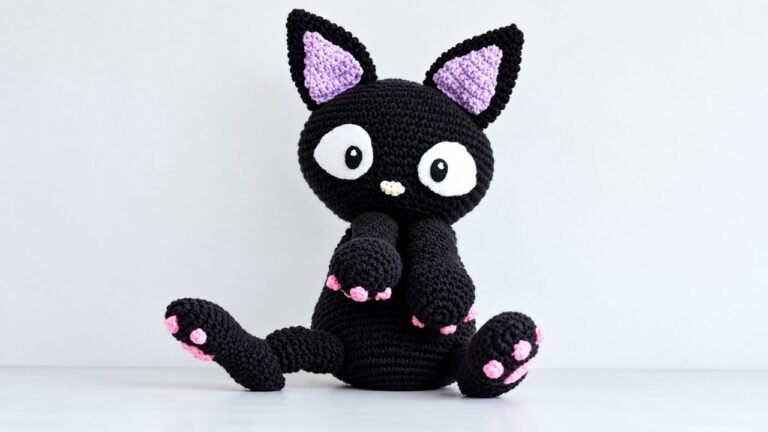
Gift, keychain, or the first of a small desk family — the hook did good work today. If you liked the no-sew construction, the crochet black cat plushie uses a similar one-piece build.
Made your own bunny in overalls?
Save this amigurumi bunny pattern for your next make, and tell us in the comments which accessory you chose — tomato headband, leaf, or headphones.

2 Comments