
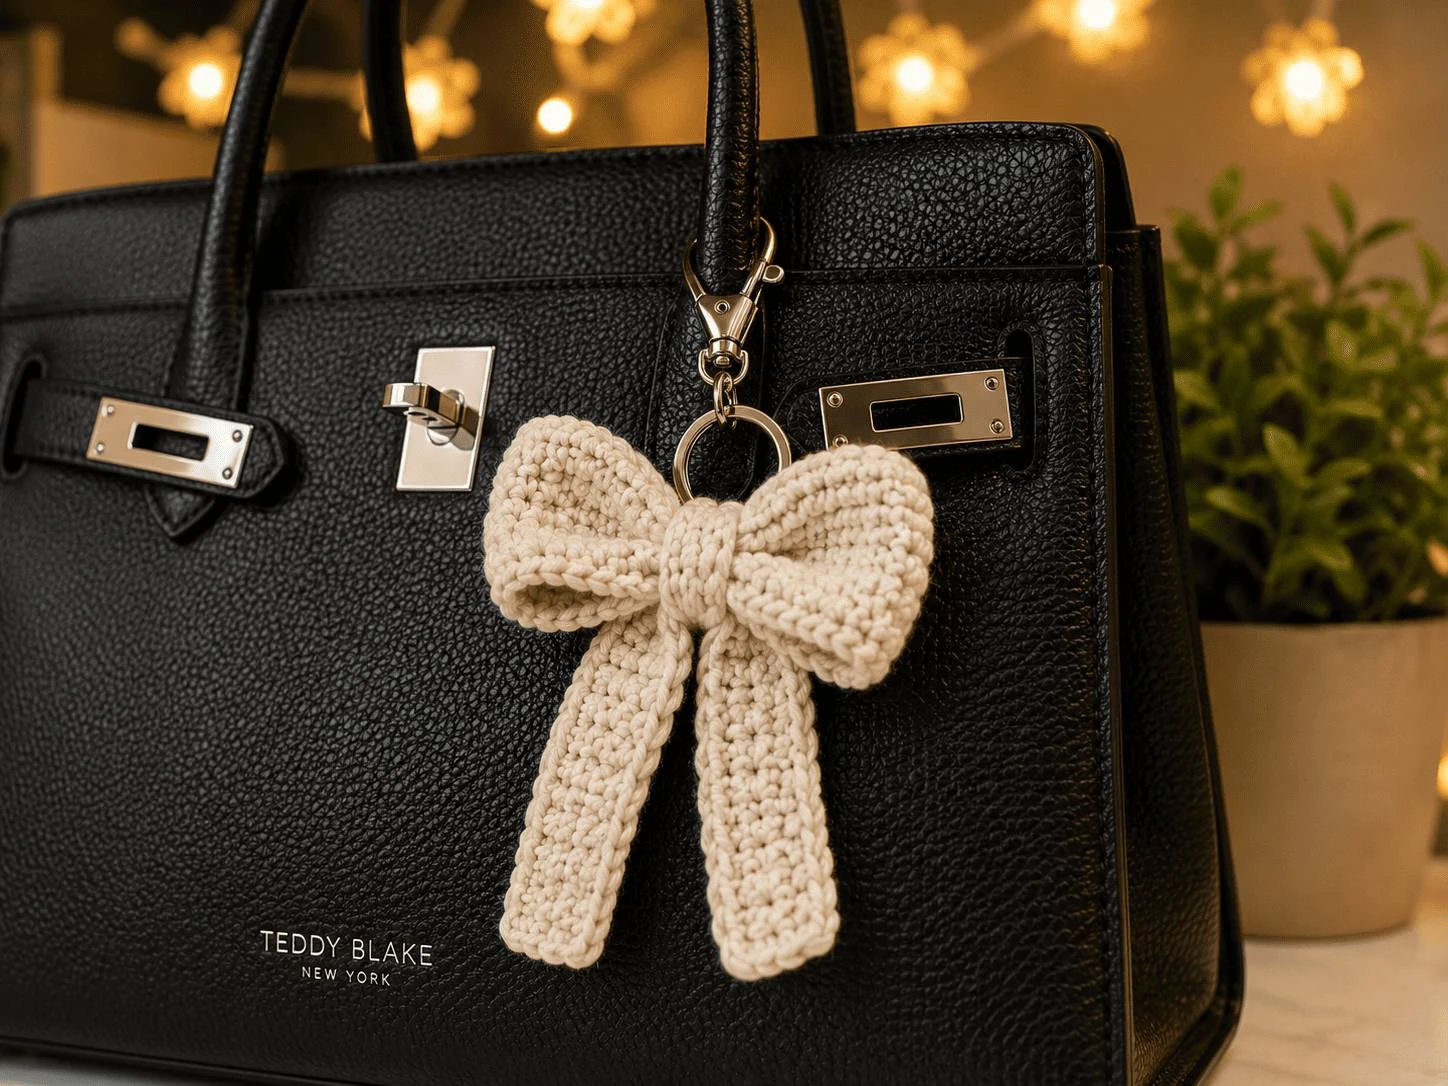
Crochet Bow: Two Flat Rectangles and About Forty Minutes
You have a bag of yarn ends. None of them are big enough for anything, and all of them are too nice to throw out, so they sit in the bottom of the basket getting flatter.
Meanwhile every pattern you save turns out to want three hundred yards and a free weekend. There is a real gap between the project you can afford to start on a Tuesday evening and the project you actually want to make.
A crochet bow fits neatly in that gap. It is two flat rectangles. No increases, no decreases, no counting rounds, nothing worked in the round at all.
What turns those rectangles into a bow is one running stitch up the middle and a pull. That is the whole trick, and once you have seen it you will find yourself making these on keyrings, hair clips, gift bags and the corner of every plain project you own.
What Is a Crochet Bow?
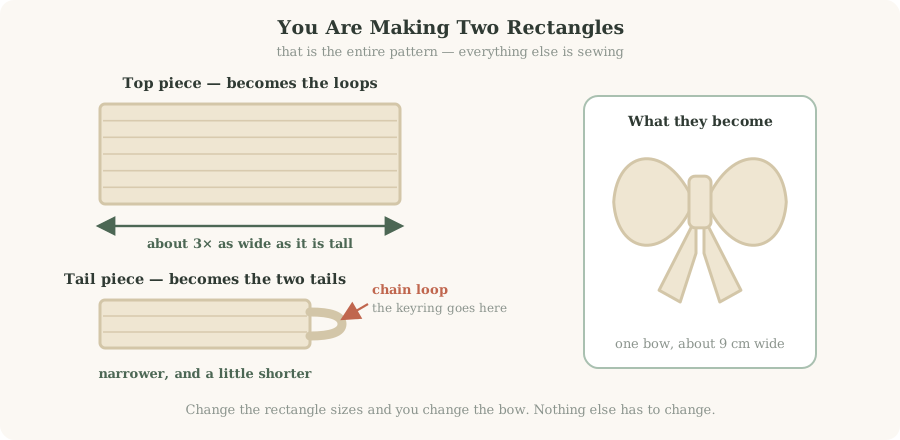
A crochet bow is a small flat rectangle worked in rows, gathered tightly through its centre with a tapestry needle, then wrapped with a few turns of yarn to hold the gather. A second, narrower rectangle is pinched at its middle and sewn behind it to make the two hanging tails. Finished, it sits about 9 cm across.
Nothing is shaped. The bow shape is not crocheted in — it is created entirely at the sewing stage, which is why this works with any stitch you already know.
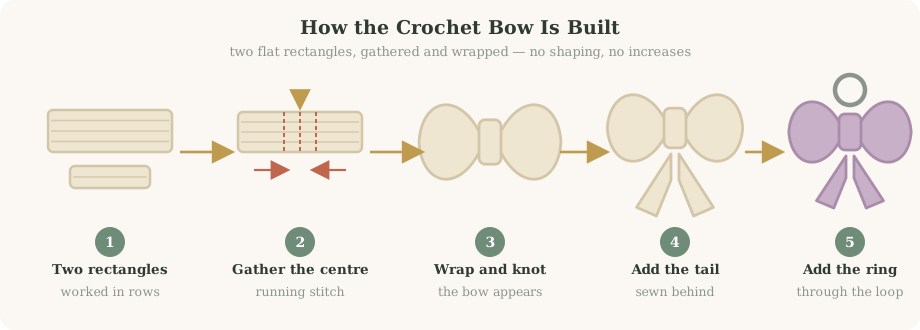
What the finished bow is made of
- A top piece — the wide rectangle that becomes both loops
- A tail piece — a narrower rectangle, pinched in the middle
- A centre wrap of three or four turns of yarn, holding the gather
- A chain loop on the tail piece, if you want a keyring through it
- Two angled ends, trimmed at a slant once everything is sewn
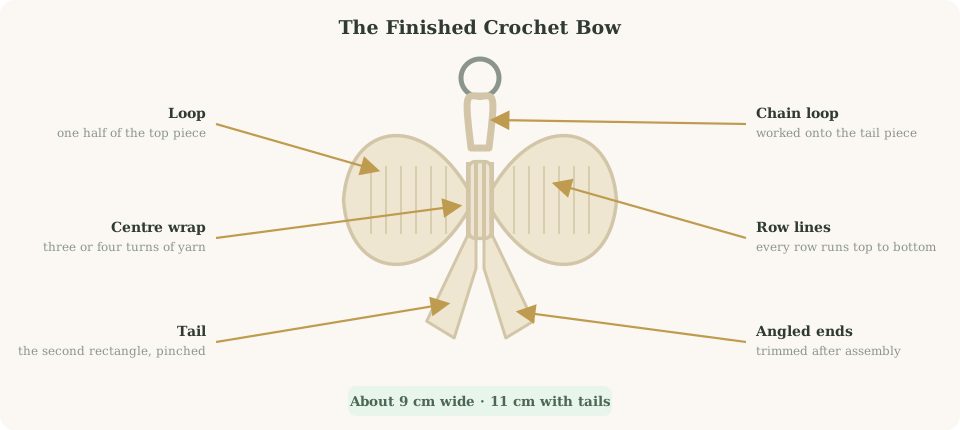
Why this suits a beginner
Rows are the easiest thing in crochet. You go along, you turn, you go back. There is no join to keep track of, no round that has to close, and no point at which a miscount ruins the shape — because the shape does not come from the stitches.
It is also genuinely forgiving. An uneven edge disappears into the gather. A row that came out a stitch short vanishes under the wrap. If you have made a flat piece before, like our basic crochet hairband, you already have every skill this needs.
What You Need
Four things, plus a keyring if you want one.
| Item | What to use | Why it matters |
|---|---|---|
| Yarn | Worsted weight (4), about 15 m | Enough body that the loops hold their shape when gathered. |
| Hook | 5.5 mm | Loose enough to gather easily. A tight fabric will not concertina. |
| Tapestry needle | Blunt, large eye | Does all the actual shaping. Not optional. |
| Scissors | Any sharp pair | For the angled tail ends at the very end. |
| Split ring | 20–25 mm, optional | Only if you are making it a keychain. |
Swipe the table sideways to see every column.
Choosing the yarn
The tutorial uses a standard acrylic worsted — Red Heart Super Saver, category 4 — and that is a sensible default. Acrylic holds a gather well and does not go limp on a keyring that lives in a pocket.
Cotton gives crisper loops and sharper tail ends, which suits a gift bow. Anything fluffy or brushed is a poor choice here: the halo hides the row lines that make a crochet bow read as crocheted rather than as a scrap of fabric. Check the ball band against the Craft Yarn Council weight system rather than the word on the label.
Stitches and Abbreviations
Everything below is in US terms. There are only four things to know, and one of them is a sewing stitch.
| Abbreviation | Stitch | Where it is used |
|---|---|---|
| ch | chain | The foundation, and the keyring loop |
| dc | double crochet | Every row of both rectangles |
| sl st | slip stitch | Closing the chain loop |
| st / sts | stitch / stitches | Throughout |
| Running stitch | sewing, not crochet | Up the centre — this is the shaping |
Swipe the table sideways to see every column.
The one technique that is new
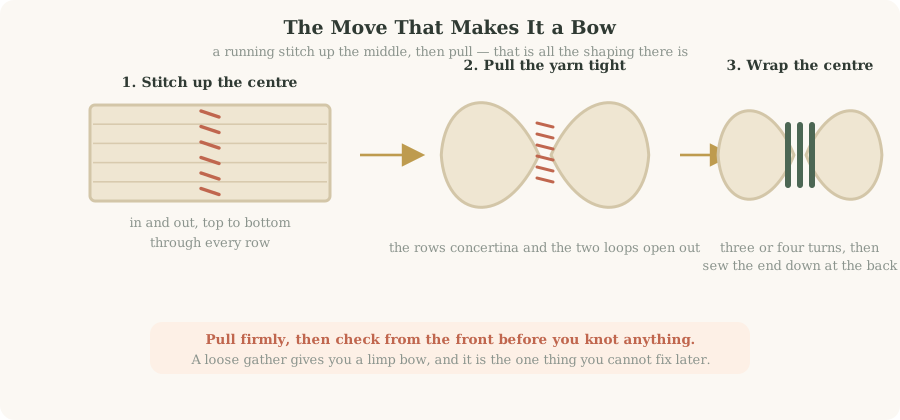
The running stitch. Thread the tapestry needle, then go in and out along a straight vertical line through the middle of the rectangle, catching every row as you pass. Small stitches. Then pull the yarn, and the rows concertina against each other into a tight column.
The pull is what people underdo. It should feel firmer than seems reasonable. A gather that is only mostly tight gives you a bow that looks slightly deflated from the side, and there is no fixing that once the wrap is sewn down.
How Big Should Yours Be?
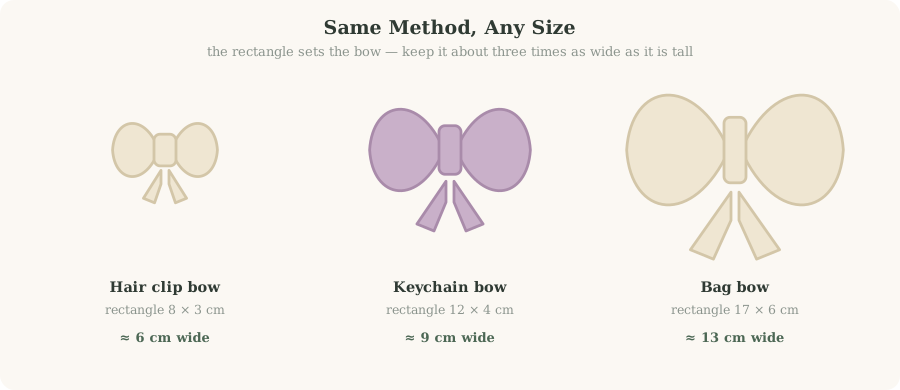
One proportion runs the whole project: the top piece should be about three times as wide as it is tall. Hold that, and the bow comes out looking like a bow at any size.
- Decide the finished width you want, then add a third. A 9 cm bow starts life as a 12 cm rectangle, because gathering pulls it in.
- Chain until the foundation measures that width, laid flat without stretching. Count what you ended up with and write it down.
- Work rows until the height is a third of the width. For a 12 cm rectangle, stop at about 4 cm.
- Make the tail piece narrower and shorter — roughly two thirds the width and half the height of the top piece.
- Check before you sew. Lay both pieces out together and look at them. This is the last moment changing anything is free.
| Size | Top rectangle | Finished width | Best for |
|---|---|---|---|
| Small | 8 × 3 cm | about 6 cm | Hair clips, gift tags |
| Medium | 12 × 4 cm | about 9 cm | Keychains, bag charms |
| Large | 17 × 6 cm | about 13 cm | Bag fronts, cushion corners |
Swipe the table sideways to see every column.
Making the Crochet Bow
The two rectangles
Both pieces are worked the same way. The only difference is how big you make them.
- Chain to your chosen width plus two extra chains, which stand in for the first double crochet of row 1.
- Row 1: double crochet into the third chain from the hook and into every chain across. Chain 2 and turn.
- Every following row is identical. Double crochet into each stitch across, chain 2, turn. Stop when the piece measures a third of its width.
- Fasten off the top piece and leave a long tail — about 30 cm. You will sew with it, so do not trim it short.
- Make the tail piece the same way, narrower and shorter, but do not fasten off yet if you want a keyring loop.
The keyring loop
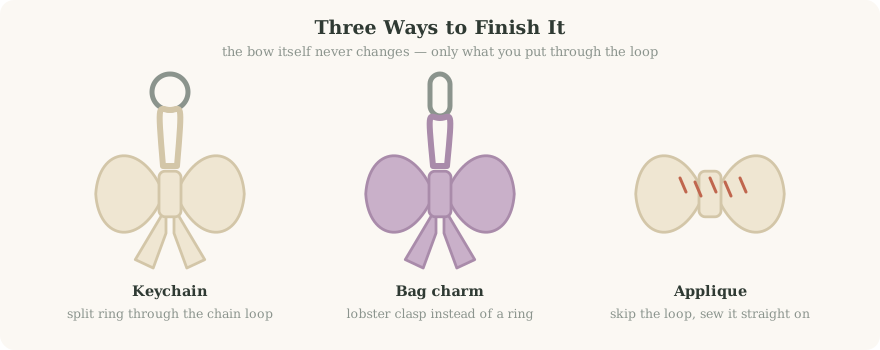
Only needed if this is going on keys. Skip it for an applique.
- At the end of the last row of the tail piece, chain about 12.
- Slip stitch back into the same stitch you started from, closing the chain into a loop.
- Fasten off with a long tail for sewing.
Gathering the top piece
This is the part that makes it a bow, and it takes about two minutes.
- Thread the long tail onto the tapestry needle.
- Run a line of small stitches straight up the centre of the rectangle, from the bottom edge to the top, catching every row as you go.
- Pull firmly. The rows will concertina into a tight column and the two halves will open out on either side.
- Hold the gather and check the front. Both loops should be the same size. Adjust now, while the yarn still moves.
- Wrap the centre three or four times with the same yarn, pulling each turn snug, then sew the end down at the back.
Adding the tail
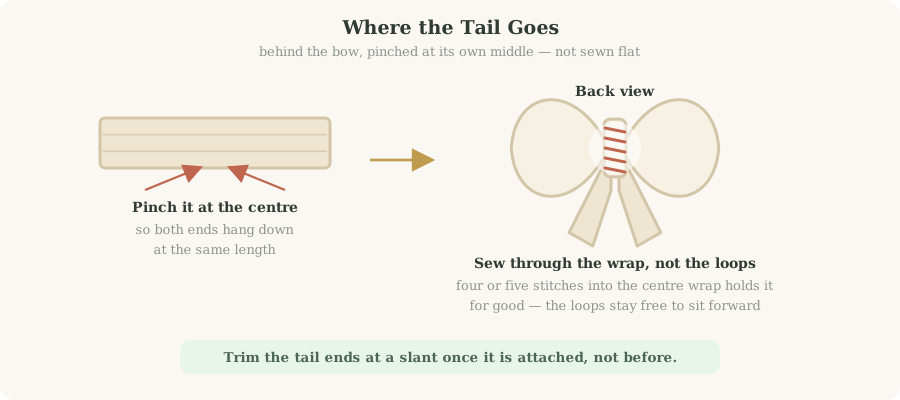
- Pinch the tail piece at its middle so both ends hang down at the same length.
- Hold it behind the bow, pinch against the centre wrap, and line the two centres up.
- Sew through the wrap, not through the loops. Four or five stitches is plenty, and it leaves the loops free to sit forward.
- Weave the ends in behind the wrap, where nothing shows.
- Trim both tails at a slant, matching the angles. Do this last, once the bow is assembled and you can see how it hangs.
Finishing it
Fixing What Goes Wrong, and What to Try Next
Troubleshooting
| What you are seeing | What caused it | How to fix it |
|---|---|---|
| The bow looks flat and sad | The gather was not pulled tight enough | Undo the wrap, pull the running stitch harder, re-wrap |
| One loop is bigger | The running stitch was off centre | Ease the fabric along the gather before wrapping |
| The centre looks bulky | Too many wrap turns, or worsted on a small bow | Three turns is usually enough; drop to two on a small bow |
| The loops flop forward | The tail was sewn through the loops | Re-sew catching only the centre wrap |
| The tails hang unevenly | The tail piece was pinched off centre | Unpick, fold it in half to find the middle, re-pin |
| The edges look ragged | Turning chains missed at the row ends | It will vanish into the gather. Leave it |
Swipe the table sideways to see every column.
Variations worth making
- Contrast wrap. Wrap the centre in a second colour. Three turns is enough to read as deliberate.
- No tails. Skip the second rectangle for a neat applique bow to sew onto a hat or a bag.
- Layered bow. Make one small and one large, gather both, and wrap them together as a pair.
- Hair clip. Sew the small size onto a snap clip through the centre wrap.
- Garland. Six bows on a length of chain makes a mantelpiece garland out of a genuinely trivial amount of yarn.
- Gift topper. Tie a small one to the rim of a crochet heart trinket dish and the present needs no wrapping at all.
How long it takes
| Stage | First time | Once familiar |
|---|---|---|
| Top rectangle | 15 min | 8 min |
| Tail rectangle | 8 min | 4 min |
| Gathering and wrapping | 10 min | 3 min |
| Sewing and trimming | 10 min | 5 min |
| Total | About 40 min | About 20 min |
Swipe the table sideways to see every column.
Looking after it
| Fibre | Washing | Getting the shape back |
|---|---|---|
| Acrylic | Hand wash cool, no heat | Finger-press the loops flat while damp |
| Cotton | Hand wash cool | Steam lightly, do not press the wrap |
| Wool blend | Spot clean only | Reshape damp and dry flat |
Swipe the table sideways to see every column.
Frequently Asked Questions About the Crochet Bow
How much yarn does one crochet bow use?
Can I use a different stitch instead of double crochet?
Why does my bow look flat instead of full?
Do I need to block a crochet bow?
How do I attach a crochet bow to a hair clip?
Can I make this without a tapestry needle?
What size keyring should I use?
Is this a good first crochet project?
Forty Minutes, One Scrap
That bag of ends in the bottom of the basket has about twenty bows in it. Not one of them takes a free weekend, and every one of them uses up yarn you were never going to knit into anything else.
What carries forward is the gather. Once you have felt a flat rectangle turn into a shape by pulling one thread, you start seeing where else it works — flowers, ruffles, puffed sleeves. It is the same move every time.
Your quick start checklist:
- Worsted weight (4) yarn, about 15 m, plus a 5.5 mm hook
- Tapestry needle, scissors, and a split ring if you want a keychain
- Top piece: a rectangle three times as wide as it is tall
- Tail piece: narrower and shorter, with a 12-chain loop if needed
- Running stitch up the centre of the top piece, then pull hard
- Wrap the centre three or four times and sew the end down at the back
- Pinch the tail piece at its middle and sew it to the wrap only
- Trim both tail ends at a slant, last of all
How wide did yours come out?
Measure it loop to loop and leave the number in the comments, along with the length you chained to get there.
It saves the next person a practice bow.
2 Comments